Updating The Raspberry Pi Cluster

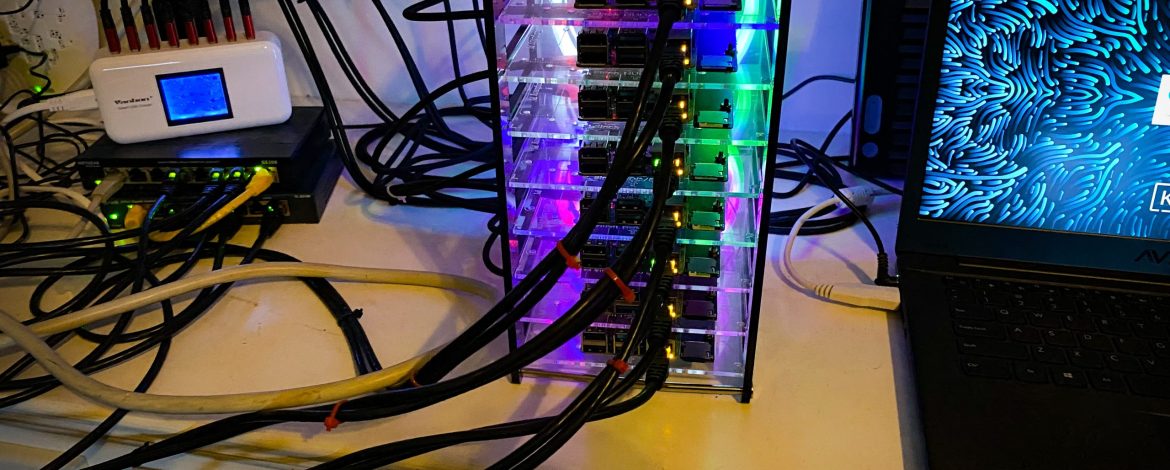
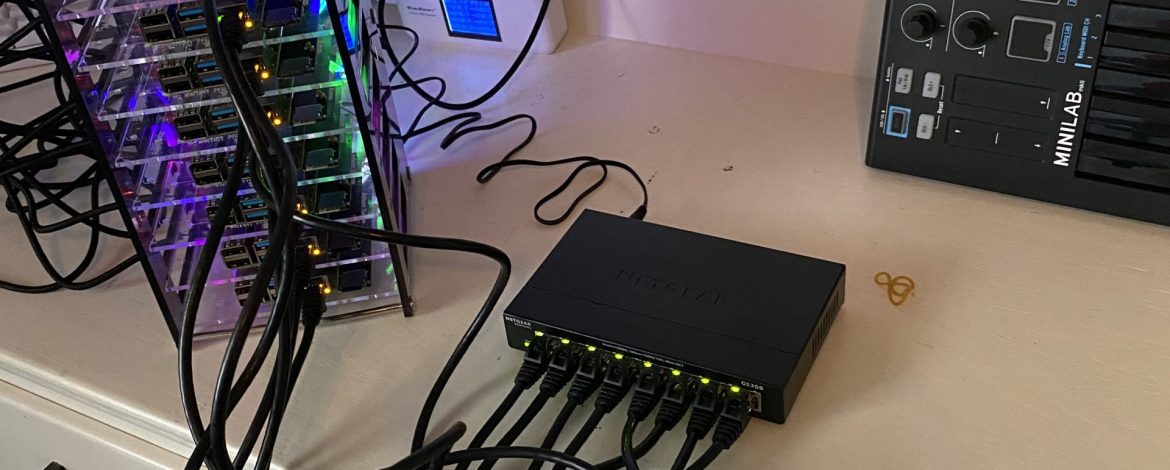
Hullo MicroK8s!

Awhile back the Raspberry Pi cluster was born. At the time, the best thing to run seemed to be Rancher Labs K3s. But soon after I installed K3s, Rancher released a new version and with this new version a lot of things changed, and what I had installed was deprecated. I could no longer update packages. Argh!

So …. I recently reinstalled the entire cluster using MicroK8s. I really like this version of K8s and I am having a lot of fun playing around with it. Currently trying to get an ELK stack to work, which has been challenging and frustrating. I am getting a huge kick out of the dashboard. How cool is this?

32 CPU’s, almost 600 GB of RAM from 8 nodes. Here are the nodes in the cluster and the portainer.io dashboard, which was really easy to install, it was a simple command to enable it as a plugin.

I’ll try and post an update when I get ELK configured. Stay tuned!

RASPBERRY PI CLUSTER RUNNING K3S – PART II

LET’S BUILD A CLUSTER AND RUN KUBERNETES!

PART II – Deploying NGINX (And A Service)

In Part I we built the hardware and installed K3s on our Raspberry Pi cluster. Now we are going to deploy some pods and a service.

The first thing we are going to do is deploy 12 NGINX servers across our cluster. We do this with a manifest file that we deploy on the master node.

Manifest: Specification of a Kubernetes API object in JSON or YAML format. A manifest specifies the desired state of an object that Kubernetes will maintain when you apply the manifest. Each configuration file can contain multiple manifests.

K8s Documentation

You can snag the two yaml files that we are going to be using from my GitHub repo here.

Log into the master node and create a file named nginx.yaml file with the following contents.

apiVersion: apps/v1
kind: Deployment
metadata:
  name: nginx
  namespace: default
spec:
  replicas: 12
  selector:
    matchLabels:
      app: nginx
  template:
    metadata:
      labels:
        app: nginx
    spec:
      containers:
      - name: nginx
        image: nginx:stable
        imagePullPolicy: Always
        ports:
        - containerPort: 80
        name: web

Some of what we are doing with this manifest file is defining our App nginx, how many replicas we want, 12 as well as the port, 80 and where we want to grab our nginx image from. With this line: image: nginx:stable we are going to go out and download the stable nginx image from hub.docker.com. You can view this here: https://hub.docker.com/_/nginx

This is a super high level view of what is going on. The K8s documentation is excellent, so if you want to dive deeper, you can.

Now that we have our manifest file ready, we can deploy it!

kubectl apply -f nginx.yaml

deployment.apps/nginx created

That’s it! Now we can view the pods with the following command.

kubectl get pods -o wide
NAME                     READY   STATUS    RESTARTS   AGE   IP           NODE   NOMINATED NODE   READINESS GATES
nginx-57d876fbcb-4gxkr   1/1     Running   9          16d   10.42.3.41   rpi2   <none>           <none>
nginx-57d876fbcb-zcfbw   1/1     Running   9          16d   10.42.3.39   rpi2   <none>           <none>
nginx-57d876fbcb-c8sth   1/1     Running   9          16d   10.42.3.40   rpi2   <none>           <none>
nginx-57d876fbcb-482nt   1/1     Running   9          16d   10.42.1.41   rpi4   <none>           <none>
nginx-57d876fbcb-6s2sv   1/1     Running   10         16d   10.42.4.40   rpi1   <none>           <none>
nginx-57d876fbcb-qv8bg   1/1     Running   10         16d   10.42.4.42   rpi1   <none>           <none>
nginx-57d876fbcb-lh6dn   1/1     Running   10         16d   10.42.4.39   rpi1   <none>           <none>
nginx-57d876fbcb-5tkbj   1/1     Running   9          16d   10.42.1.40   rpi4   <none>           <none>
nginx-57d876fbcb-vgcdj   1/1     Running   11         16d   10.42.5.47   rpi5   <none>           <none>
nginx-57d876fbcb-529lw   1/1     Running   11         16d   10.42.5.48   rpi5   <none>           <none>
nginx-57d876fbcb-v99r6   1/1     Running   11         16d   10.42.5.50   rpi5   <none>           <none>
nginx-57d876fbcb-v62jk   1/1     Running   9          16d   10.42.1.42   rpi4   <none>           <none>

Magic. Right? K3s is powerful and super easy to use. Trying to get K8s working on bare metal is a bear of a task, K3s definitely make it easier.

We are not done yet. Now we need to be able to access these notes. Notice above that the IP address are not on our subnet. For example 10.42.1.42. These are cluster IP’s and they are only available within the cluster. So what we need to do is expose our app to the rest of the network. To do that we are going to use a service. I would stop right now and go read this. It will be worth understanding what a service is.

On the master node, create a file named nodeport.yaml with the following contents.

apiVersion: v1
kind: Service
metadata:
  name: nginx-nodeport
  namespace: default
spec:
  type: NodePort
  selector:
    app: nginx
  ports:
    - name: web
      port: 8080
      targetPort: 80
      nodePort: 31234

Basically we are going to port forward the external port 321234 to port 80 on our web server. Now let’s deploy!

kubectl apply -f nodeport.yaml

deployment.apps/nginx-nodeport created

To see if it really worked you can run the following command.

kubectl get services
NAME             TYPE        CLUSTER-IP      EXTERNAL-IP   PORT(S)          
kubernetes       ClusterIP   10.43.0.1       <none>        443/TCP          
nginx-nodeport   NodePort    10.43.209.167   <none>        8080:31234/TCP   

Now for the real test. Visit a node with the 31234 port in a browser. For example: 192.168.1.174:31234. You should see the default nginx page.

Troubleshooting

When I first ran through the tutorial, so much was just not working. This was due to a few things. First, between the author publishing the tutorial video and my attempt, a major release happened. Lots changed. As well, the manifest files just were not working. Not sure why that is, but they were not. So I scrapped those and built them from scratch using the documentation.

The biggest issue was the nodeport. I could not for the life of me reach the web server on my network. If you run into this as well, hopefully the following will be helpful.

I was getting a connection refused. I have been in IT long enough to know that message means I am actively being denied. It’s not a 404 or a random config error. Something is blocking me. See below.

$ curl http://192.168.1.175:31234
curl: (7) Failed to connect to 192.168.1.175 port 31234: Connection refused

So I took a peak at the firewall, and the last line explained it.

Chain KUBE-SERVICES (2 references)
target     prot opt source               destination
REJECT     tcp  --  anywhere             10.43.209.167        /* default/nginx-nodeport:web has no endpoints */ tcp dpt:http reject-with icmp-port-unreachable

What! Why! I read through the docs and the life saving articles over at stack overflow and pieced together that when K8s is misconfigured, it adds that line to the firewall. It’s protection. So it was a misconfiguration after all. Where?

Something was up with the naming of the port. Calling it web was failing. I saw this in the error log. So I swapped “web” with the actual port, 80 and that did the trick.

One of the cool commands I used to track this down was describe.

kubectl describe svc nginx-nodeport
Name:                     nginx-nodeport
Namespace:                default
Labels:                   <none>
Annotations:              <none>
Selector:                 app=nginx
Type:                     NodePort
IP Family Policy:         SingleStack
IP Families:              IPv4
IP:                       10.43.209.167
IPs:                      10.43.209.167
Port:                     web  80/TCP
TargetPort:               web/TCP
NodePort:                 web  31234/TCP
Endpoints:                <none>
Session Affinity:         None
External Traffic Policy:  Cluster
Events: 

I asked for 12 replicas, so I should see 12 endpoints. But there were none listed. Hmmmmm. Turns out, you create a nodeport with no endpoints, because you are me and you are new to K3s, that the firewall is going to be modified. After my fix, the same command shows me my 12 endpoints. Endpoints: 10.42.1.4:80,10.42.1.5:80,10.42.1.6:80 + 9

kubectl describe svc nginx-nodeport
Name:                     nginx-nodeport
Namespace:                default
Labels:                   <none>
Annotations:              <none>
Selector:                 app=nginx
Type:                     NodePort
IP Family Policy:         SingleStack
IP Families:              IPv4
IP:                       10.43.209.167
IPs:                      10.43.209.167
Port:                     web  8080/TCP
TargetPort:               80/TCP
NodePort:                 web  31234/TCP
Endpoints:                10.42.1.4:80,10.42.1.5:80,10.42.1.6:80 + 9 more...
Session Affinity:         None
External Traffic Policy:  Cluster
Events:

And now I can reach the page from my network.

curl http://192.168.1.175:31234
<!DOCTYPE html>
<html>
<head>
<title>Welcome to nginx!</title>
<style>
    body {
        width: 35em;
        margin: 0 auto;
        font-family: Tahoma, Verdana, Arial, sans-serif;
    }
</style>
</head>
<body>
<h1>Welcome to nginx!</h1>
<p>If you see this page, the nginx web server is successfully installed and
working. Further configuration is required.</p>

<p>For online documentation and support please refer to
<a href="http://nginx.org/">nginx.org</a>.<br/>
Commercial support is available at
<a href="http://nginx.com/">nginx.com</a>.</p>

<p><em>Thank you for using nginx.</em></p>
</body>
</html>

Raspberry Pi Cluster running K3s – Part I

Let’s build a cluster and run Kubernetes!

Part I – Building The Cluster & Installing Kubernetes

I was doing some cybersecurity research on YouTube one day when I came across a somewhat related video where a guy built an 8 node Raspberry Pi cluster and got it to run Kubernetes, or K8s as it’s widely know. Well actually this is running K3s, which is basically K8s.

I was hooked and decided to give it a try. So I purchased everything I needed to run 8 Raspberry Pi 4 8GB nodes in a cluster. It was a lot of fun to do, and by fun I mean I ran into so many roadblocks and challenges. In fact, I am still stuck at one spot, waiting on Rancher or someone in the Rancher community to lend me a hand. Their install script to install the Rancher GUI, it’s not working.

I decided to document what I did because the video leaves out quite a bit. Some of the config files just don’t work, and I am not able to locate any of the documentation the author of the video, Chuck, mentions several times in the video. Rather I got to know the Rancher docs very well. Which is a good thing. I reached out to Chuck about the documentation, but he has not responded. I imagine my email is just one of many, many emails that he may eventually get to.

I’ll start with what I purchased and where. Then I’ll go into the setup and provide some working yaml files. My hope is that you will be able to follow this guide step by step and in the end have a Raspberry Pi cluster running Kubernetes. How cool is that? On bare metal. And you don’t need 8, that’s super overkill, in fact you can technically do this with just one node, but two makes more sense. A single node can act as both the master and a worker node.

Grocery List

This is list of suggestions for what to get. You will need at a minimum, a Raspberry Pi, power and networking. This is what I purchased to get things going for an 8 node cluster.

Getting Started

The first thing we will need to do is get our first node online. These steps will apply for each node you have in your cluster. We are going to install Raspberry Pi OS Lite which you will download when imaging the memory card. To do this you will use the Raspberry Pi Imager.

Ready for some steps? Here we go.

  1. Take a memory card and put that into the provided adapter and mount that on your computer.
  2. Use the imager to install the OS, it will be in the Operating System menu under Raspberry Pi OS Other.
  3. Unmount the memory card and insert it into the Raspberry Pi. Power the RPI on and let it boot up. This is headless, so you will need to let it go for about 60 seconds. Once it’s booted it will create a directory of files. We are going to edit some of those.
  4. Power off the RPI and remove the card. Mount that card on your computer once again and navigate to mount and the files. On a Mac that’s going to be /Volumes/boot/.
  5. Edit config.txt and at the bottom of the file add arm_64bit=1.
  6. Edit cmdline.txt and add cgroup_memory=1 cgroup_enable=memory ip=192.168.1.170::192.168.1.1:255.255.255.0:rpimaster:eth0:off The values that will change from node to node is the IP and the hostname. So in this example, 192.168.1.170 would change on the next node and rpimaster would change as that’s the hostname.
  7. Lastly, you need to create an empty file named ssh. On a Mac that’s as simple as touch ssh.
  8. That’s it. Now you can unmount the card, put it back in the RPI and power it on. After a few minutes you should be able ssh to the node.ssh pi@192.168.1.170. The password will be raspberry. Wohoo! You are now sitting on your RPI. Repeat this step for as many times as you have nodes.

Installing K3s

  1. This next step needs to be run on each node, this will give us the correct iptables rules for K3s. First run sudo iptables -F bin/iptables-legacy then sudo update-alternatives --set ip6tables /usr/sbin/ip6tables-legacy and lastly run sudo update-alternatives --set iptables /usr/sbin/iptables-legacy
  2. Now it’s time to install K3s. On the master node, run this command. curl -sfL https://get.k3.io | K3S_KUBECONFIG_MODE="644" sh -s - and sit back and watch it go.

Now you can run a simple command to see if it worked.

`root@rpimaster:/home/pi# kubectl get nodesNAME        
STATUS  ROLES                  AGE  VERSION
rpimaster  Ready    control-plane,master  21s  v1.21.4+k3s1

Looking good. This master node is the control-plane,master.

Now it’s time to register the rest of the nodes. To do this we are going to tell each node about the master node using a token.

root@rpimaster:/home/pi# cat /var/lib/rancher/k3s/server/node-tokenK10f07158496cafcbd96f225afb04c391d385d967d8009a954dc334afa0aebffaa5::server:332bebecd5a2ba35f9914e75a05bf14f

Now on each node (you will ssh in to each one) run this command.

curl -sfL https://get.k3s.io | K3S_TOKEN="K10f07158496cafcbd96f225afb04c391d385d967d8009a954dc334afa0aebffaa5::server:332bebecd5a2ba35f9914e75a05bf14f" K3S_URL="https://192.168.1.170:6443" K3S_NODE_NAME="rpi1" sh -

The only value you will change from node to node is the K3S_NODE_NAME="rpi1" value.

And that’s it! To see our nodes, run kubectl get nodes. You should see the following output.

pi@rpimaster:~ $ kubectl get nodes
NAME STATUS ROLES AGE VERSION
rpimaster Ready control-plane,master 12d v1.21.4+k3s1
rpi7 Ready 11d v1.21.4+k3s1
rpi2 Ready 11d v1.21.4+k3s1
rpi6 Ready 11d v1.21.4+k3s1
rpi5 Ready 11d v1.21.4+k3s1
rpi1 Ready 11d v1.21.4+k3s1
rpi4 Ready 11d v1.21.4+k3s1
rpi3 Ready 11d v1.21.4+k3s1

We are running Kubernetes on bare metal. πŸ™‚

Next up, we will be deploying NGINX across our nodes. Continue on to Part II!